Drone Nerding

Thanks to lockdown in Sydney I haven’t been out of the house a lot over the last few months, but this morning I took my drone down to Scylla Oval at Como to get some air time. As well as being a fairly scenic part of Sydney, it’s also an area with no airspace restrictions for drones as it avoids the flightpaths for both Sydney and Bankstown airports, and is outside the 3NM limits for both of them, so there are no annoying geo zones to have to unlock.

As well as just getting out of the house, enjoying the sunshine and having some air time, there were two new reasonably nerdy drone things I wanted to try out.

One was the new livestreaming feature in the latest release of the DJI Fly app (v1.4.12, in case you’re interested) where the drone camera can send its feed directly to YouTube. This is pretty easy to set up just by going to your YouTube account and from the Live Streaming page, grabbing the stream URL and unique stream key, appending them together like so, rtmp://a.rtmp.youtube.com/live2/xxxx-xxxx-xxxx-xxxx-xxxx, then adding them to the Fly app as an RMTP link.

You’ll find your stream settings on the livestream page in YouTube Studio

Once you do that you can use the Fly app to send what the camera sees live to YouTube and share your flight with the world. I’m not sure what I’d use this for yet, but it’s pretty cool to know that it’s an option. To be clear, this 1080p HD video below was not captured to the SD Card and downloaded after the flight, it was streamed live to YouTube over a 5G connection as the drone was flown.

Live footage captured from the Mavic Air 2

The second thing was my Dronelink software, which I bought a while ago but hadn’t had a chance to try out. Dronelink allows you to create “missions” in advance on your computer and then upload those missions to the drone to fly autonomously. In plain language, you can plot out your exact flight path, including altitude, camera angles, etc, and then have the drone execute that mission for you. On the Mavic Air 2 it uses a technique called Virtual Sticks, which basically means that the computer will fly for you, sending inputs to the drone as though you were manipulating the flight control sticks yourself. Of course, I had VLOS (Visual Line of Sight) at all times and was ready to take over the controls and abort the mission if needed, but the two missions I flew were exactly as planned, and I’m pretty impressed with the way DroneLink works.

Another thing you can do with Dronelink is to use the Map component to plot out a grid pattern over a selected area, and have the drone autonomously follow that grid while automatically taking photos of the ground below. This is how you create a high resolution map image of an area, known as an orthomosaic. By taking a set of images, which individually are reasonably high resolution but don’t cover a large area, you can later use image processing software to stitch them together into a much larger, very high res image.

I selected just a small part of Scylla Oval to fly a grid over and Dronelink calculated the appropriate flight path and settings based on the 25m altitude I set.

Planning the mission path using DroneLink on the web

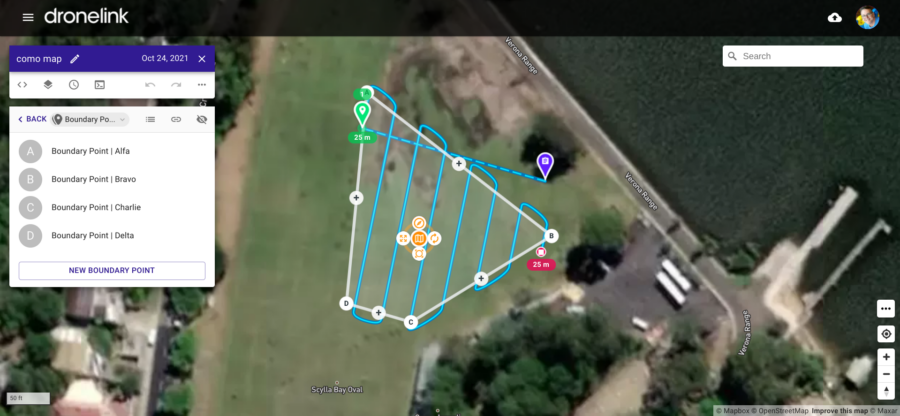
Flying the mission was as easy as pressing the play button in the app. The drone took off, flew to the start point, followed the grid while taking a photo every 5m or so. After flying the mission it automatically returned home and landed. It was a bit nerve racking the first time, as I watched it fly off, hoping it would follow the instructions, but it was faultless. While I can fly it ok manually (I am a fully CASA qualified UAV Remote Pilot) it was definitely pretty cool handing over to the computer like this and having the whole thing happen autonomously. The drone returned with 58 JPEG images, each almost 6MB in size. Do the math, that’s 348MB, which is quite a lot of image!

Back at home, I used the Photomerge feature in Photoshop to stitch them together into a single image. Even though the individual images were basically all just grass, Photomerge was able to identify patterns and patches in the grass, the cricket pitch, etc, to pull them all together, then blend them to account for aperture variations, etc. The resulting file was pretty huge (a single 11,532px by 10,963px image at 168MB), and it was clear that Photoshop was really working hard to bring it together, but it worked.

Stitched image of Scylla Oval taken from a drone
58 aerial shots taken at 25m altitude stitched into a single composite image (10% of actual size)

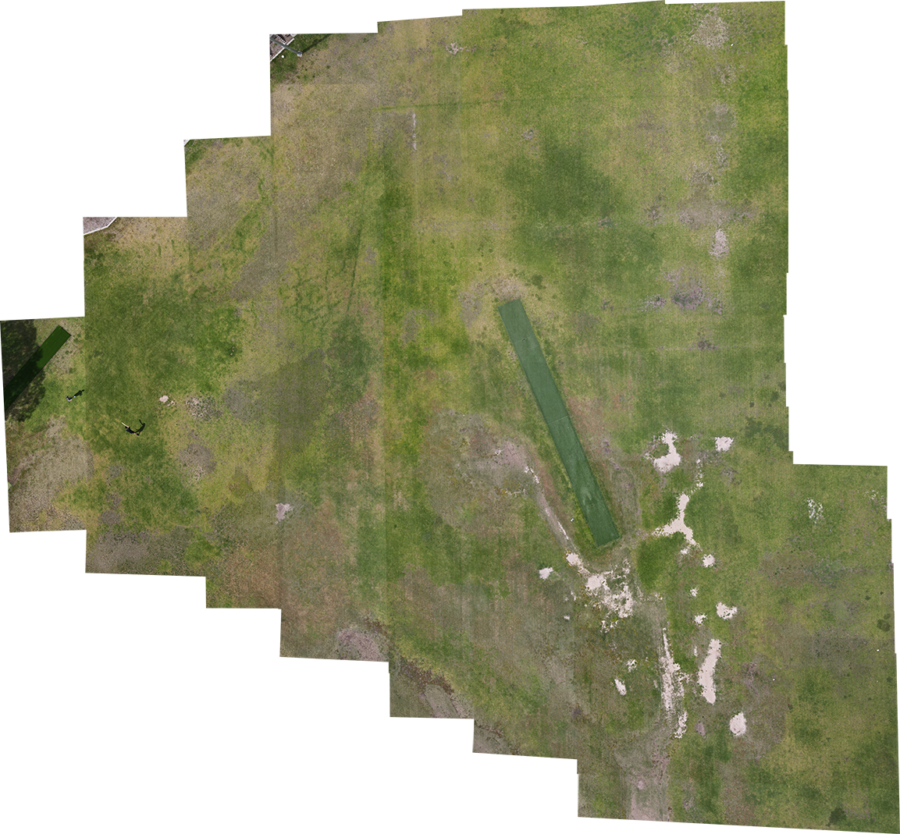
I’m looking forward to trying this technique on something a little more interesting than some grass in a park, but as a proof of concept, I’m pleased with it. If you’d like to see the full resolution 160MB image you can take a look here. (It was too big for WordPress’s upload limit so its hosted on Google Photos where you can zoom in on it. I also dropped a 360 Panorama taken from the drone in there as well, just in case you’re interested in getting your bearings by seeing a more in-situ version of the ground)

I don’t expect many of you will find this nearly as interesting as I did, but there you go, you got it regardless.

Five things I really like about ChromeOS

I saw my first Chromebook, the original Cr48, over 10 years ago. I’ve deployed them into my own school with great success. And I now use them as my primary computing device every day. As a Mac user for many years, an occasional dabbler in Linux, and a Windows user for many more before that, I found the simplicity and ease of use of ChromeOS a refreshing and welcome change.

Despite initially seeing a Chromebook as an easy alternative for a bit of web browsing, it took me a while to get to the point where I could see it as a viable option for my primary computer. Despite finding myself regularly using my Chromebook to present at conferences and workshops, I’d bring my MacBook along “just in case”. Eventually, after a lot of travelling around the world carrying two computers, I realised that I almost never used the Mac anymore, and I actually preferred to use the Chromebook. I still remember packing for a trip one day, and looking at my MacBook on the desk and thinking “should I or shouldn’t I take it?” I didn’t. The world didn’t end.

It’s funny how we can become so attached to an operating system, to the point where we convince ourselves that we can’t possibly adjust to a new one. I remember when I switched from Windows to Mac, I agonised over the decision. I overanalyzed it, made lists of all the apps I used to ensure there was an equivalent on the Mac side. Then when I made the switch, I wondered why I waited so long. And it was the same as I started to use a Chromebook more. “What if I need to do X and the Chromebook can’t?” I’d think. It took me a while to get to the point where I could let it go, but once I did, and adopted the Chromebook as my daily driver, I have never really looked back.

Here are 5 things about ChromeOS that I would miss a lot if I had to go back to a conventional operating system.

A keyboard that makes sense

One of the first things you notice about a Chromebook is that there are different keys on the keyboard. The usual row of function keys is replaced with a set of keys that do the kinds of things a modern web user would want – a back button, refresh button, buttons for going full screen and exposing all the current windows, as well as buttons for adjusting brightness and volume. (If you really want the function keys back, you can switch them back in the settings) The Caps Lock key is missing too, but I’ve always thought it was a useless addition to a keyboard. Again, if you really want it you can enable it in the settings, or just press the alt key to get it.

The other nice thing about the keys is that they are shown in lowercase letters. For young users this is great, as they can better recognise the letters, but even for me I find the lowercase letters just provide a sense of calm and simplicity. I saw a Windows keyboard recently and really felt a sense of busyness with the uppercase letters and so many keys also marked with additional functions. The Chromebook keyboard has a real zen feel about it.

I really like the way the keyboard feels on my Chromebooks. Maybe I’m just comparing them to the ridiculously awful keyboard on my MacBook Pro, which is without question the worst typing experience I’ve ever had.

There are a ton of awesome keyboard shortcuts too. Just press the ctrl+alt+/ keys to see a fully searchable list of shortcuts, or check out this list.

The Everything Button

Ok, I know this is still part of the keyboard, but it’s such a big deal it gets its own mention. The “Everything Button” as it’s called (or sometimes just referred to as the Search key) is so incredibly useful, I can’t imagine not having it. Pressing it once brings up a search field, where entering a search term will search your device, your apps, your settings and even the web.

Tapping the Everything Button and typing the first few letters of, say, the word ‘classroom’ will let you immediately open Google Classroom. Just type ‘cla’ and press enter and you’re in the app within seconds.

Typing the word ‘hello” might offer you a link to a video of Adele performing her song of that name, a link to an online website such as hellofresh.com, or a chance to say hello to the Google Assistant.

Starting to type the word ‘lesson’ presents me with the list of documents stored in my Google Drive that contain the word lesson.

And of course if you just want to search the web, just tap the Everything button and type your search query instead of heading over to Google.com.

Once you get used to having search so deeply embedded into the operating system you won’t go back.

Multiple Copy and Paste

Usually when you copy something on your computer it replaces the last thing you copied. Typically most computers can only store the last thing you copied, making it annoying if you are doing a lot of copying and pasting.

On a Chromebook the usual cut and paste system applies – ctrl+c for copy, ctrl-v for paste. But if you use the Everything Key (let’s call it ‘search’ for simplicity) when you paste – so search+v – then you’ll get an option to paste any of the past 5 things you copied! And not just the last 5 pieces of text either. If you copied a picture, or a table, or some formatted text, it lets you paste exactly what you copied.

Somewhat related (although not exclusive to ChromeOS) it’s also worth noting that if you use shift+ctrl+v when you paste, your pasted text assumes the formatting of the location you’re pasting it into. So if you copy a piece of text that is, say, red 16pt Georgia bold, and paste into a block of text that is black 12pt Arial italic, the pasted Georgia text will become the same size, colour and format as the Arial text it’s being pasted into. Handy!

Accessibility options for everyone

ChromeOS has some amazing accessibility options, all built-in right at the operating system level. From ChromeVox, the built-in screen reader for people with vision impairment, to simple and easy to use screen magnifiers, resizable cursors and highlight tools, dictation mode, select to speak, mono audio and more, every Chromebook comes with a ton of built-in customisations to allow every user to tailor the experience to best suit themselves.

It highlights the fact that accessibility doesn’t just mean catering to people with disabilities or special needs (although it certainly does do this). It means providing options to make the Chromebook work in ways that make the most sense, with the most usability, for every user.

It just works.

Honestly the best thing about Chromebooks is that they just work. The operating system gets out of the way because it’s light and simple and obvious. You don’t get constantly interrupted with updates that disrupt your workflow or make you wait for hours before you can use your computer. Updates just happen in the background, and won’t bug you.

I really like the fact that Chromebooks are based on the user not the device, which means that whatever device you log into, all your stuff is there. So if you want to work on multiple Chromebooks, or have your students share a set of Chromebooks, or even if you lose one and have to get another, once you log in again all your stuff is there. Documents, bookmarks, extensions, settings, everything. It is literally like being on the same machine.

Starting your Chromebook takes about 8 seconds to get to the login screen, and then another few seconds once you log in. The slowest part is typing in your password, although if you have your phone paired to your Chromebook you can just unlock your phone (usually with your fingerprint) and then tap the Chromebook login screen and you’re in. And once you’re in, the battery just keeps going and going and going and going.

So there you go, that’s five things. As I read back over what I’ve written, I realise how much of a Chromebook fanboy I sound like, and perhaps I am. But if a regular person asked me to recommend a computer for them, unless they had a really specific reason or use case for needing Windows or Mac, it would take a lot for me to recommend anything but a Chromebook. They really are the right computer for the vast majority of regular people that just want to get online and get stuff done without the computer getting in the way all the time.

I haven’t even touched on the way Chromebooks can be managed centrally through the admin console, so maybe I’ll write another post on that sometime and why these devices make so much sense for schools.

The Wrong Question

Over the years, one of the common questions I have regularly heard being asked by schools that are in the process of moving from one technology platform to another is about the choice of substitute apps.

I’ve heard it when I’ve been in schools that made the switch from Microsoft to Google – “But the teaching program says we have to use PowerPoint! I can’t use Slides!” or “But I can’t use Docs, all my stuff is in Word!”

I’ve heard it when people switched from one type of phone operating system to another – “I used to use iMessage on my iPhone, but there’s no iMessage on Android! Now what?!”

I recently heard someone ask what Chromebook apps they could use to replace the apps they used to use with their iPads – “I need to know what apps to use on the Chromebook to teach robotics!”

Asking what apps should be used on a new platform to replace the things that you used to do on the old platform seems like a valid question. Certainly if a school is moving from iPads to Chromebooks, or Google to Microsoft, or Windows to Mac, or whatever other combination you want to think about, then yes, at some point there probably needs to be some consideration given to which tools will be used to produce the things that need to be produced.

Asking “I used to use X, and now I need to use Y, so what are the equivalent apps?” is probably a question that needs some kind of answer at some point.

However, I think this is the wrong question to start with. I think there is a bigger, more important question that needs to be asked first.

Rather than “I used to use iMovie and now I need to find a replacement for iMovie”, the better question is “How can my students tell stories?”  In other words, if you only ever think in terms of the tool, you will be stuck on the idea that you need an exact replacement for the tool you currently know.  Shifting your thinking to frame the question in terms of the outcome you want students to achieve changes the conversation.

Thinking in terms of wanting students to be able to explain a concept, persuade an audience, communicate an idea, or compare and contrast two options is based on the VERBS found in your curriculum documents and is the stuff we need to teach. Your curriculum does NOT say your students need to know how to use iMotion or picCollage or Photoshop or Outlook or <insert name of any tech tool here>. These tools are simply the nouns we can use to teach the verbs. 

Those tools – the nouns – are transient however. They are not set in stone. They change over time as better options and newer versions some along, and sometimes they even go away completely, as evidenced by the long list of apps that once existed but no longer do.

But the verbs… the verbs are timeless. We will still be teaching students how to explain, persuade, communicate, compare, etc, long after some tech company decides to stop producing that app you used to think you couldn’t live without.

As teachers we need to stop focusing on the nouns (the tools) and focus more on the verbs.  When you do that, the actual tools become far less important.   In my opinion, the mark of a good technology user (and a great teacher) is being able to easily switch to new nouns while never losing sight of the verbs.